- Videoconferencing Dashboard
- Support
- Account Menu
- Features Menu
1. Videoconferencing Dashboard
Dashboard: overview
You can reach this page any time by clicking on the "Videoconference" tab along the top of your window.
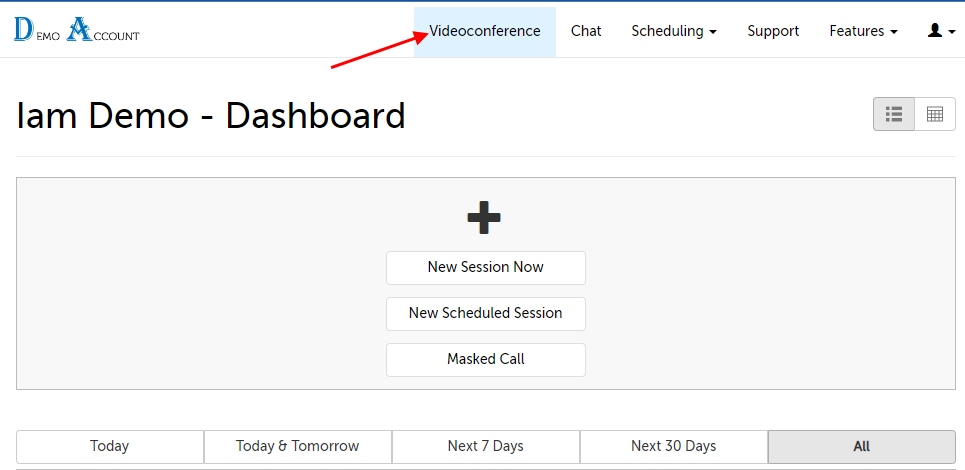
There are 3 buttons always on your Dashboard:
- New Session Now: Schedule a new session for right now (it will prepopulate the date and time).
- New Scheduled Session: Schedule a new session for a future time (you choose the date and time).
- Set Up Masked Calling OR Masked Call: Masked Calling is a feature where a user can verify a phone number with SecureVideo, and then call through SecureVideo (from a browser on a mobile device or computer) and have that verified number appear in the patient's Caller ID.
These buttons are located at the top of the dashboard by default; they can be moved to the bottom by using the "Show 'New Session' buttons at the top of the dashboard" Option.
For more on scheduling sessions:
Use the buttons along the bottom for other actions:

Dashboard: view, edit, or launch sessions
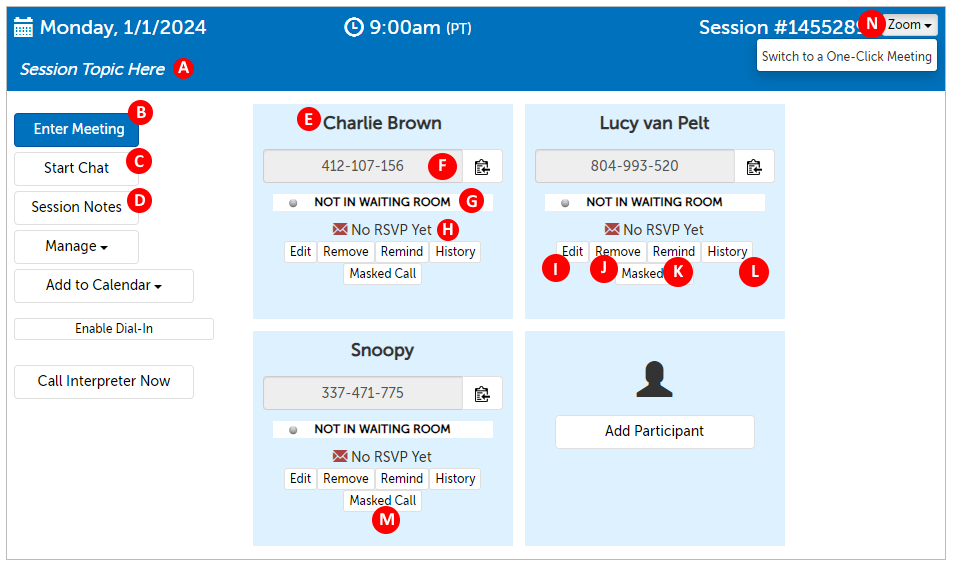
- A. The Session Header is where (if applicable) the following are shown:
- B. Enter Meeting: Launches your meeting.
- C. Start Chat: Starts a Clinical Chat with all participants of the session.
- D. Session Notes: if enabled, this button creates a free-form text session note about the session participants. For structured notes, consider assigning an e-document to the host.
- E. Name of participant (Minimum of 2 characters.) If the participant is a fellow account holder in your organization account, your company name will follow in parentheses.
- F. 9-digit access code for participant (if no invitation sent, this is the code they must enter on the Join Session page). Click the clipboard icon to copy the join link.
- G. Status: displays status of participant.
- For Zoom-based sessions, this status is a proxy that turns on when a participant clicks "Enter Waiting Room". If the participant had trouble launching Zoom, they may need to troubleshoot on their end to complete their half of the connection.
- H. RSVP for participant (RSVP Unknown, RSVP Confirmed or RSVP Declined, or if no contact information is entered, E-Mail/Text Not Used)
- I. Edit: edit participant's information: contact information, invite method, or time zone.
- J. Remove: remove participant from session.
- K. Remind: manually send reminder to participant. (Reminders are automatically sent about 2 hours before and 10 minutes before session start time, unless reminders are disabled in Account Settings.)
- L. History: view the activity history for this participant in this session (e.g., what time invitations were sent)
- M. Masked Call: if enabled, and there is a phone number entered for this contact record, this will start a VoIP phone call to this number, through your browser. If no phone number is entered for this contact, a dial pad will appear to enter a phone number.
- N. If both Zoom and One-Click are enabled as video engines, a menu here allows the host or scheduler to switch.
Dashboard: manage sessions
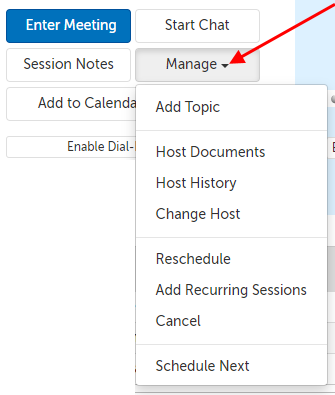
On the left-hand side of each session panel, click on "Manage" for the following options:
- Add/Edit Topic: This item appears if the "Meeting Topic" option is enabled.
- The item will be "Add Topic" if there is currently no topic, and "Edit Topic" if there is already an existing topic.
- The Meeting Topic option allows users to include/require the Topic as part of scheduling the session.
- Host Documents: This item is how e-documents can be assigned to a host to fill out.
- Host History: View the host's activity history for this session (e.g., what confirmations were sent to the host for this session)
- Change Host: This item can be used to select a new host for the session.
- Reschedule: Reschedule the session for a new date/time. (Automatically sends reschedule notices.)
- Add Recurring Sessions: If you would like this session to automatically schedule the next session, you can set up a recurrence schedule.
- Cancel: Cancel the session. (Automatically sends cancellation notices.)
- 5 minutes after the session start time has passed, this becomes Remove instead, and removes the session from your dashboard without sending cancellation notices. (Old sessions are automatically removed every morning.)
- Schedule Next: Create one single copy of this session (with the same participants and settings). The date will pre-populate as 7 days from the time of this session, although the date can be changed before the session is scheduled.
Dashboard: add sessions to an external calendar
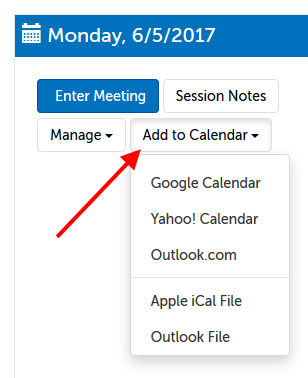
On the left-hand side of each session scheduled for a specific time and date, click on "Add to Calendar" to add the session to the following calendars:
- Google calendar
- Yahoo! calendar
- Outlook.com calendar (web-based)
- Apple iCal calendar
- Outlook calendar (desktop application)
This feature is a one-way push. To set up a calendar sync, please see these support articles:
2. Support
You can reach this page any time by clicking on the "Support" tab along the top of your window.
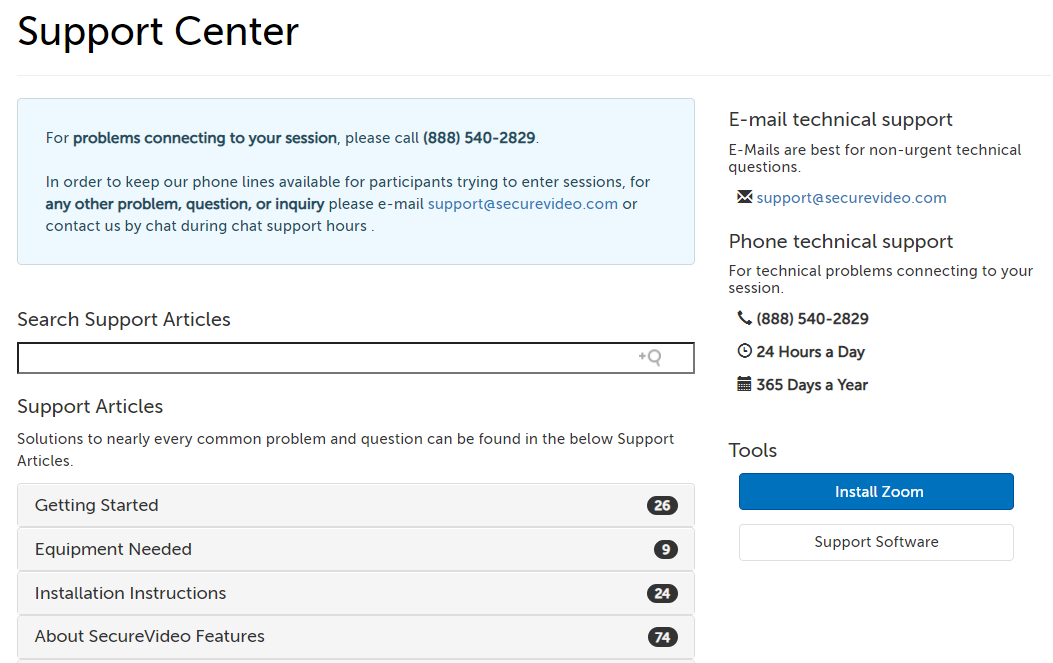
- Find the phone number and e-mail address for our support team on the right-hand side column.
- Click on the section headings to open our documentation categories.
3. Account Menu
The below instructions assume an Account Administrator role, which allows you to view/manage account permissions. Depending on your user role, you may not see all of the following items mentioned.
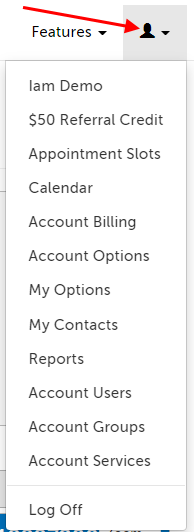
To access your account settings, click on the profile icon in the upper right hand corner for the following options:
- Your name (in this example, "Iam Demo"): Edit your account profile information and basic settings (e.g., email address, time zone, etc).
- $50 Referral Credit: If you know of someone that could use SecureVideo, please let us know! They'll get a $50 credit to start, and we'll add a $50 credit to your account if your referral keeps their account.
- Appointment Slots: Manage the availability for your public calendar(s).
- Calendar: View scheduled sessions in calendar format. (If you are an Account Administrator or Scheduler, view all scheduled sessions on the account.)
- My Account: View and/or edit billing information, plan details, and invoice history for the account.
- My Contacts: View, create, and/or edit your saved contacts.
- My Settings: Access your e-mail notification settings and/or close your account.
- Session Usage: Look up session history for your user account. If permitted by your user role, you can also look up session history for other users.
- Account Users: Displays all the users on your Enterprise account. From here, Account Administrators can manage account users, Clinical Supervisors can access users' session notes and E-documents, Schedulers can schedule sessions on behalf of users, and Billing Managers can view available user licenses on the account.
- Account Groups: This item is only visible if you are using Appointment Slots or Virtual Clinic. This is a different item than Contact Groups.
- Account Services: Set up account services to require payment before your participant can enter the session.
- Log Off: Log off of your account.
4. Features Menu
The below instructions assume an Account Administrator role, which allows you to view/manage account features. Depending on your user role, you may not see all of the following items mentioned.
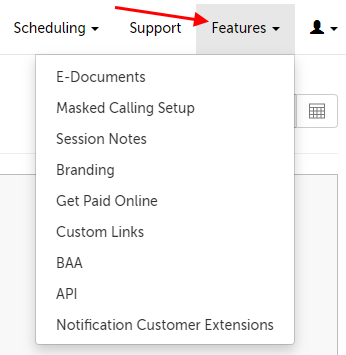
To access your account settings, click on the profile icon in the upper right hand corner for the following options:
- E-Documents: Create electronic documents or access received documents.
- Masked Calling Setup: Manage the Masked Calling feature.
- Session Notes: Enable, create, and/or edit session notes.
- Branding: Customize your account with your own logo, colors, and URL.
- Get Paid Online: Connect a Stripe account, or add a PayPal or Authorize.net merchant button to your waiting room page.
- Custom Links: Add a custom link to your waiting room pages.
- BAA: Access the Business Associate Agreement for your account.
- API: If enabled, view your API pricing and keys from here.
- Notification Customer Extensions
This article was last reviewed by our Support team on November 1, 2023.