Step 1 - Add Provider NPI Numbers in your SecureVideo account
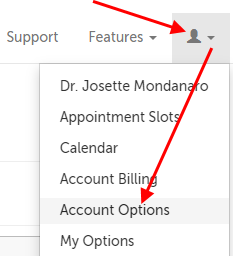
1. Login into your SecureVideo Account Administrator account.
2. Click on the profile icon and select "Account Options".
3. Click on the "Scheduling" section to expand it, and then enter the text "NPI Number" under "External ID Label".

4. This will add a property on the Profile tab where admins and/or hosts can input providers’ NPI number.
- If you'd like the field name to be anything else, you can enter that into the field instead.
Now, add in NPI numbers for the Providers for whom you will be scheduling sessions.
For customers with a large number of Providers, you are also able to use the Update User API to add in NPI Numbers. You can also send a spreadsheet of e-mail addresses and NPI numbers to our support team, and we will be happy to enter these for you.
Return to Top
Step 2 - Review Mirth Documentation (optional, if you're already familiar with Mirth)
Make sure you have the latest version of Mirth, and review availabile documentation.
NextGen also has a number of resources for Mirth Connect.
Return to Top
Step 3 - Install Mirth (optional, if you already have Mirth installed)
If you don't have Mirth Connect installed, you can download and install it from the Mirth Connect Downloads page.
Return to Top
Step 4 - Create and Configure Four Channels and their Source Connectors
Create channels for each of the SIU-12, SIU-13, SIU-14, and SIU-15 messages that your EHR will emit. In the left-hand navigation, select “Channels” to see your list of channels. Then right-click, and select “New Channel”, and create the four new channels.

On the Source tab for each channel, you will specify the source connector for each channel, which is what will receive the HL7 SIU message from your EHR. The configuration of the Source connector will vary by EHR vendor and by your EHR's configuration but will often be a TCP Listener using MLLP as the transmission mode, or a File Reader.
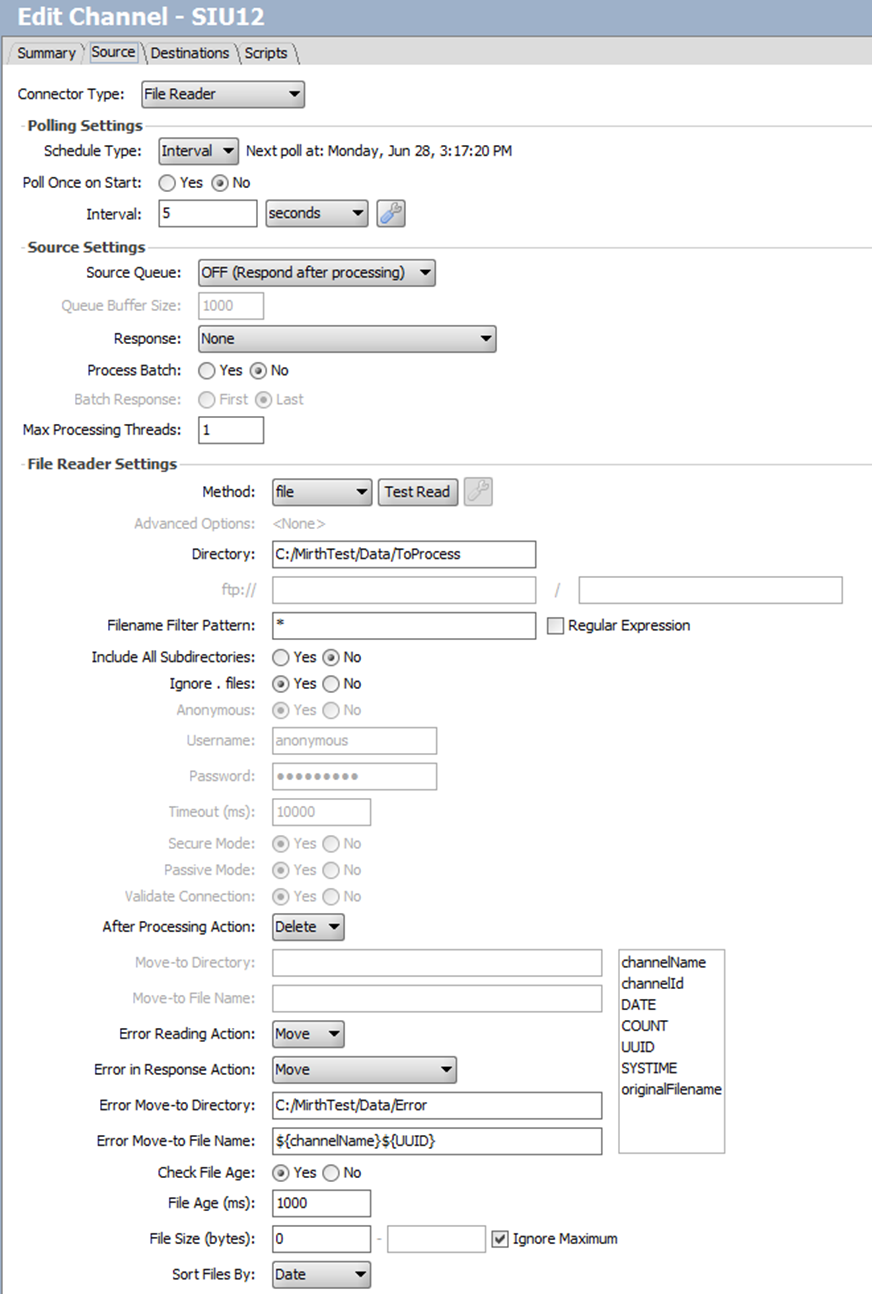
The screenshot above shows a recommended configuration if you are using a File Reader connector. In this case, the EHR would drop an HL7 SIU file in a location which Mirth is monitoring; in the screenshot above,
C:\MirthTest\Data\ToProcess
Note that the “After Processing Action” is set to Delete, so that once the SIU message is successfully processed, it is deleted so that it cannot process duplicatively. If the SIU message errors out (i.e., it is not successfully processed), then the “Error Reading Action” and “Error in Response Action” are set to “Move”, which will move the errored SIU message into a folder “C:\MirthTest\Data\Error”. From there, you could monitor that folder for errored SIU messages and retry them once the error condition is fixed.
The SecureVideo API works well with the Mirth error paradigm. If the HTTPS API call to SecureVideo succeeds, SecureVideo will always return an HTTP 200 status, whereby Mirth considers the message to have been processed successfully. If the HTTPS API call to SecureVideo fails, SecureVideo will always return an HTTP 400 (bad request) or HTTP 500 (internal SecureVideo error) status, whereby Mirth considers the message to have failed and will take whatever failure action you prescribe in your channel configuration.
The Destination connector for each channel will be the connector that makes the calls to the SecureVideo API. The configuration for these channels are explained in the following steps.
Return to Top
Step 5 - Define Filters for SecureVideo Messages
Because SecureVideo automatically sends session invites, reminders, updates, and cancellation notifications to both providers and patients, you should first ensure that you are filtering all of your Source Connectors (SIU-12, SIU-13, SIU-14, and SIU-15) to ensure that you are sending to SecureVideo messages only for those appointments which will be handled by SecureVideo. Please be sure you are not sending in-person appointments to SecureVideo, otherwise patients will receive notifications informing them that they have a SecureVideo telehealth appointment.
To filter out only those SIU messages for SecureVideo telehealth sessions, on each channel (SIU-12, SIU-13, SIU-14, and SIU-15) you will create a Mirth Filter which returns true only when the session is tagged with a "telehealth" or "SecureVideo" flag in your EHR. How you choose to set that flag (and therefore define the corresponding filter) will vary from EHR to EHR.
Return to Top
Step 6 - Create SIU-12 Destination Connector
When a new session is scheduled within your EHR, Mirth's Source Connector will receive an SIU-12 message. A minimal SIU-12 message for SecureVideo integration might have the message header (MSH), scheduling (SCH), patient information (PID), and provider information (AIP). Here is an example SIU-12 message, however it goes without saying that depending on the configuration of your EHR the field mappings may be quite different than the below:
MSH|^~\&|MESA_OP|XYZ_HOSPITAL|iFW|ABC_HOSPITAL|20210613061611||SIU^S12|24916560|P|2.6||||||

SCH|10345^10345|2196178^2196178|||10345|OFFICE^Office visit|reason for the appointment|OFFICE|60|m|^^60^20220617084500^20220617093000|||||9^DENT^ARTHUR^||||9^DENT^COREY^|||||Scheduled

PID|1||42||SMITH^PAUL||19781012|M|||1 Broadway Ave^^Fort Wayne^IN^46804||510-555-1212^PRN^CP| ^NET^Internet^[email protected]||S||999999999|||||||||||||||||||||

AIP|1|A|1234512345^Dr^Smith^^^^|D^White,Douglas||20110614084500|||45|m^Minutes|| Scheduled
The 7 data elements that you will pass to SecureVideo are shown in boldface in the above example SIU-12 message. They are, in order:
- Schedule ID of the session (10345)
- Scheduled Date/Time of the session (202206517084500)
- Patient ID in your EHR (42)
- Patient Name (Paul Smith)
- Patient Mobile Number (510-555-1212)
- Patient E-Mail Address ([email protected])
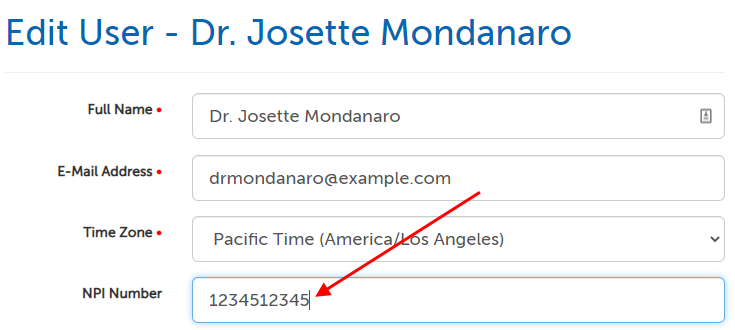
- Provider NPI Number (1234512345)
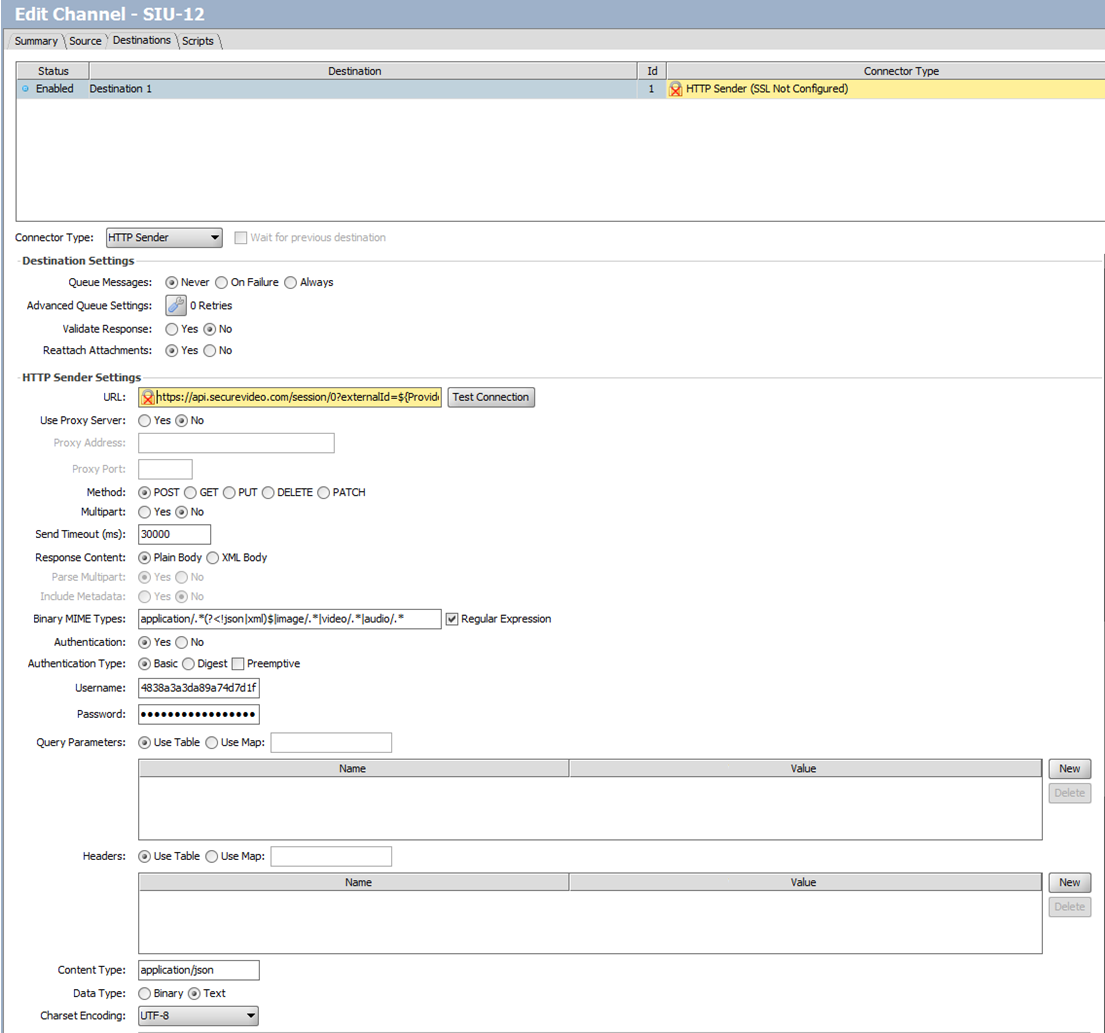
To pass these into SecureVideo, you would first configure your SIU-12 Destination Connector with the following properties:
- URL = https://api.securevideo.com/session/0?externalId=${ProviderNpi}
- Method = POST
- Response Content = Plain Body
- Authentication = Yes
- Authentication Type = Basic
- Username = Your SecureVideo API Identifier
- Password = Your SecureVideo API Secret Key
- Content Type = application/json
- Data Type = text
- Charset Encoding = UTF-8
In the “Content” property, place the following JSON which will be sent to the SecureVideo API to create the session:
{
 "ScheduleTs": "${ScheduleTs}",
 "ExternalSessionId": "${ExternalSessionId}",
 "Participants":
 [
  {
   "ParticipantFullName": "${PatientName}",
   "ParticipantEmailAddress": "${PatientEmailAddress}",
   "ParticipantSmsNumber": "${PatientMobileNumber}",
   "ParticipantDefaultResolution": "high",
   "ParticipantTimeZoneWindowsId": "Eastern Standard Time",
   "ParticipantExternalId": "${PatientInternalId}",
   "ShouldAutoDeliverCode": "S"
   "PacketId": 1215,
   "SvcId": 1037,
   "DepositRequired": 20.00
  }
 ]
}
In the JSON example above, the following example values were used:
- ParticipantTimeZoneWindowsId: "Eastern Standard Time" was used as an example. For other valid inputs, please see: List of Time Zone values
- ShouldAutoDeliverCode: "S" stands for a text message invite (requires ParticipantSmsNumber to exist). Other options are:
- "E": If ParticipantEmailAddress exists, the SecureVideo system will send via e-mail a Session invite and Session reminders to this participant.
- "N": No automatic delivery of the code will occur. The Session host, or your system, will be responsible for providing invites and reminders to the Participant.
- PacketId: "1215" is an example E-documents packet ID. If you will not be using e-documents, you don't need to include this. If you would like to assign an e-document packet to this participant for this session, find the packet ID by logging in as an Account Administrator or Clinical Supervisor to find the ID: E-Documents: managing packets
- SvcId: "1037" is an example Account Service ID. If you will not be using Account Services, you don't need to include this. If you would like to assign an Account Service to this participant for this session, find the service ID by logging in as an Account Administrator or Billing Manager to find the ID: How do Account Services work?
- DepositRequired: "20.00" is an example required payment amount. If you will not be using required payments, you don't need to include this. If you would like to assign a payment amount to the participant, SvcId must also be included.
The last step to complete your SIU-12 connector is to define the variable mappings which appear in the URL—${ProviderNpi}—and Content properties: ${ScheduleTs}, ${ExternalSessionId}, ${PatientName}, ${PatientEmailAddress}, ${PatientMobileNumber}, and ${PatientInternalId}. You do this by creating 7 transformation steps in your destination connector:
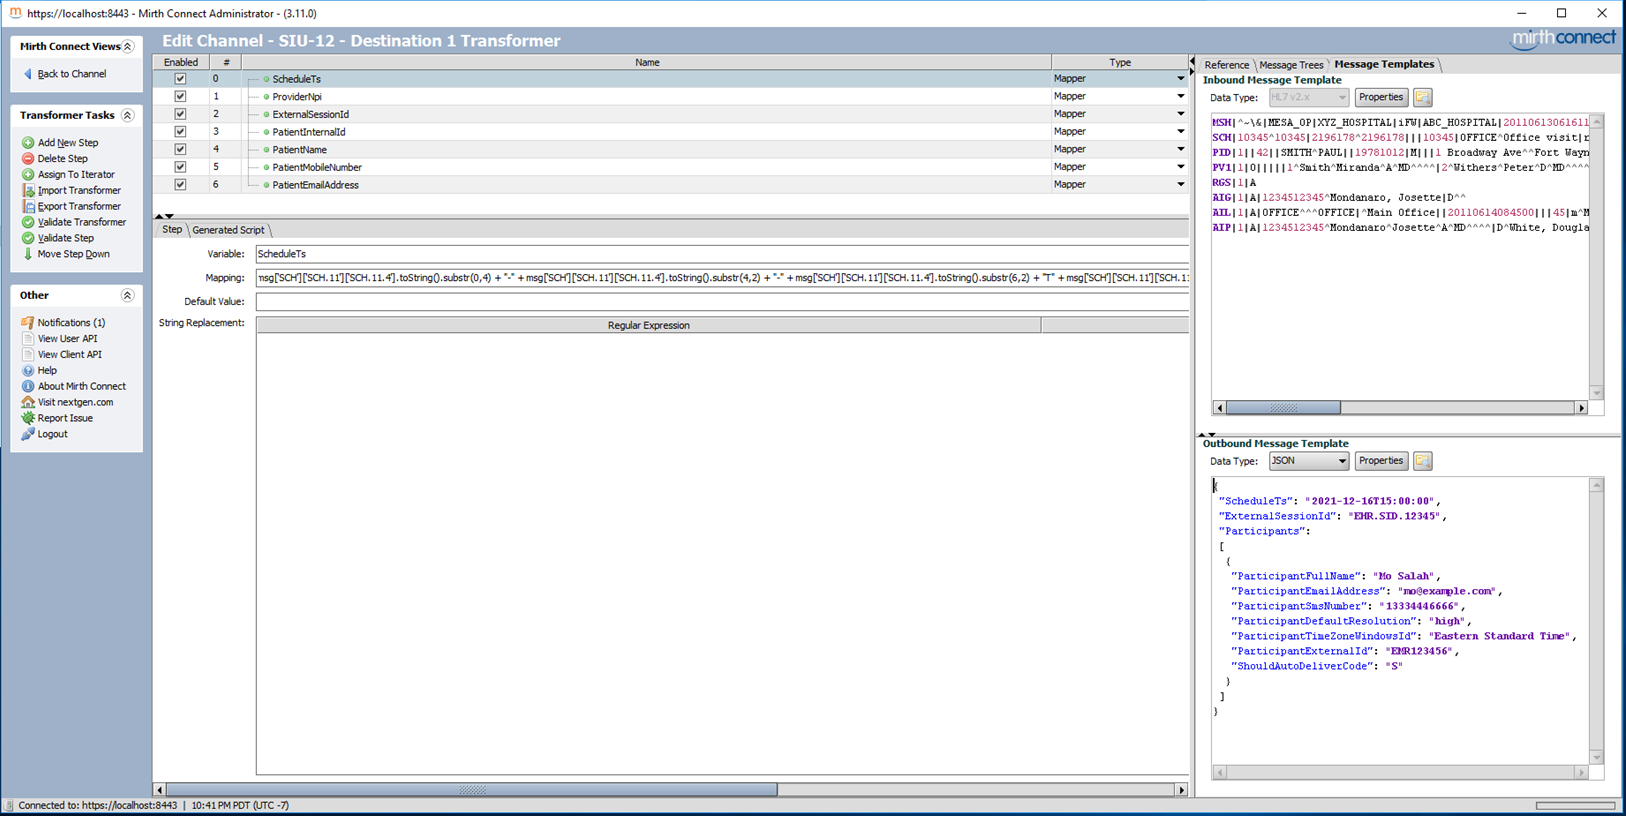
You can create an inbound message template from a sample SIU-12 message (very useful), and an outbound message template from a sample SecureVideo API Create Session POST body (possibly useful, see https://hub.securevideo.com/Knowledge/Details/86#create). This will allow you to easily create variables by dropping example values from the “Message Trees” tab in Mirth into the “Mapping” property for each transformation step.
Notice that above, we have our 7 transformation steps. These will populate the variables that are referenced in our URL and Content on the Destination property page. The mappings depend entirely on where the required 7 properties arrive from your source connector. For example, in the table below, we assume that the scheduled start time of the session is in segment SCH.11.4, which is usually where the scheduled start time will be. However, we also assume that the Provider NPI number will arrive in the AIP.3.1 segment, which could very easily be coming from a different source segment in your SIU-12 feed.
Variable
|
Mapping
|
Comment
|
|
ScheduleTs
|
var local_ts = msg['SCH']['SCH.11']['SCH.11.4'].toString();
var source_time_zone = "America/New_York"; // Could also be "UTC" if you already use UTC
var formatter_hl7 = new java.text.SimpleDateFormat("yyyyMMddHHmm");
formatter_hl7.setTimeZone(java.util.TimeZone.getTimeZone(source_time_zone));
var formatter_utc = new java.text.SimpleDateFormat("yyyy-MM-dd HH:mm");
formatter_utc.setTimeZone(java.util.TimeZone.getTimeZone("UTC"));
var date_in_utc = formatter_utc.format(formatter_hl7.parse(local_ts));
|
Here we convert the time to the correct format, and from localtime to UTC if necessary. The SecureVideo API requires times sent as UTC.
|
|
ProviderNpi
|
msg['AIP']['AIP.3']['AIP.3.1'].toString()
|
Different EHRs will put this in different places. Could be in PV1 or other locations.
|
|
ExternalSessionId
|
msg['SCH']['SCH.1']['SCH.1.1'].toString()
|
|
|
PatientInternalId
|
msg['PID']['PID.3']['PID.3.1'].toString()
|
|
|
PatientName
|
msg['PID']['PID.5']['PID.5.2'].toString() + " " +
msg['PID']['PID.5']['PID.5.1'].toString()
|
You may need to concatenate the name elements together.
|
|
PatientMobileNumber
|
msg['PID']['PID.13']['PID.13.1'].toString()
|
In PID.40 in HL7 2.7+. Needs to be formatted 999-999-9999.
|
|
PatientEmailAddress
|
msg['PID']['PID.14']['PID.14.4'].toString()
|
In PID.40 in HL7 2.7+.
|
In our example Content above in this document, we were statically setting ShouldAutoDeliverCode to “S”, meaning we would always send text message invites and reminders to every patient. If you do not always have a mobile number for a patient, you may wish to add a Mirth variable called DeliveryMethod (using a Javascript transformation step) and set it to “S” if there is an SMS number for that patient, or “E” if you only have an e-mail address. Then your content would have “ShouldAutoDeliverCode”: “${DeliveryMethod}” instead of “ShouldAutoDeliverCode”: “S”.
Also, note that the patient mobile number needs to be in the format 999-999-9999. If you do not already have the mobile number in this exact format, you may need to use a Javascript transformation step for PatientMobileNumber instead of a Mapping transformation step to ensure that the mobile number is in the correct format.
Once you have implemented the above, you should be able to create a SecureVideo session by processing an HL7 SIU-12 message through your SecureVideo SIU-12 Mirth Channel.
Return to Top
Step 7 - Create SIU-13 and SIU-14 Destination Connectors
When a modification is made to the session within your EHR, Mirth's Source Connector will receive an SIU-13 or SIU-14 message, depending on the nature of the modification. The only modifications that you will generally want to sync to SecureVideo would be (1) a rescheduling of the session start time, which is very common; and, (2) changing the session host, which is less common.
To configure this, you should create four new channels: SecureVideo SIU-13 Reschedule, SecureVideo SIU-13 Change Host, SecureVideo SIU-14 Reschedule, and SecureVideo SIU-14 Change Host. Each channel will have two steps and use the exact same configuration outlined in the previous Step (Create SIU-12 Destination Connector), with the following changes:
SIU-13 Reschedule and SIU-14 Reschedule
- URL = https://api.securevideo.com/session/0?externalSessionId=${ExternalSessionId}
- Method = PUT
- Content = {"ScheduleTs": "${ScheduleTs}"}
- You will only need to add transformation steps to create the variables ExternalSessionId (which goes in the URL property) and ScheduleTs (which goes in the Content property)
SIU-13 Change Host and SIU-14 Change Host
- URL = https://api.securevideo.com/sessionhost/0?externalSessionId=${ExternalSessionId}
- Method = PUT
- Content = {"ExternalUserId": "${ProviderNpi}"}
- You will only need to add transformation steps to create the variables ExternalSessionId (which goes in the URL property) and ExternalUserId (which goes in the Content property)
Note that while the URL query string parameter is ${ProviderNpi} for SIU-12 (which creates a new session for a certain provider), when processing SIU-13, SIU-14, and SIU-15 messages we are directly managing the session that was created using SIU-12, and therefore the URL query string parameter is ${ExternalSessionId}, which is the ID of the session in your EHR.
From a processing and network bandwidth perspective, it is ideal if you are able to create a Mirth filter to determine whether the schedule time or session host have changed, and then only process the SIU-13/14 into a SecureVideo API call if the change included a reschedule. If this is not possible, it is acceptable to call the SecureVideo API twice (once for Reschedule and once for Change Host) per every SIU-13/14 that is received for a session which is marked as “SecureVideo” or “Telehealth” in your EHR. The SecureVideo API will see that the schedule time and/or session host has not changed, and the API call will have no effect.
Return to Top
Step 8 - Create SIU-15 Destination Connector
When a session is cancelled within your EHR, Mirth's Source Connector will receive an SIU-15 message. You will want to cancel this session in SecureVideo as well. To configure this, you should create one new Channel, SecureVideo SIU-15, and use the exact same configuration outlined in the previous Step (Create SIU-13 and SIU-14 Destination Connectors), with the following changes:
- URL = https://api.securevideo.com/session/0?externalSessionId=${ExternalSessionId}
- Method = DELETE
- Content = [blank]
- You will only need to add one transformation step to create the variable ExternalSessionId (which goes in the URL property)
Return to Top
Conclusion
The above simple set up should get you most of the way to having your EHR connected to SecureVideo quickly and painlessly. Most customers will generally have to (1) add some custom logic here or there based on their particular EHR and Mirth configuration, and (2) use different mappings that the ones presented in this document. Even with that in mind, leveraging the power and ubiquity of Mirth allows SecureVideo to perform highly impactful integrations in a very short period of time. These integrations streamline workflows, maximize accuracy, and eliminate double entry for telehealth sessions, all while allowing you to use the full flexibility and power of the SecureVideo telehealth solution.
This article was last reviewed by our Support team on November 1, 2021.